how to use Select Box with Search Option using jQuery and php

how to use Select Box with Search Option using jQuery and php

How to use Select Box with Search Option using jquery and PHP?

Step1: Create select2 folder

Step2: Add index.html

inside html add following code

<!doctype html>
<html class="demo">

<head>
    <meta charset="utf-8">
    <meta http-equiv="X-UA-Compatible" content="IE=edge">
    <meta name="viewport" content="width=device-width, initial-scale=1">
    <title>select2-bootstrap-theme</title>
    <link rel="stylesheet" href="bootstrap.min.css">
    <link rel="stylesheet" href="//cdnjs.cloudflare.com/ajax/libs/select2/4.0.3/css/select2.min.css">
    <link rel="stylesheet" href="select2-bootstrap.css">

    <!--[if lt IE 9]>
		<script src="//oss.maxcdn.com/html5shiv/3.7.2/html5shiv.min.js"></script>
		<script src="js/respond.min.js"></script>
	<![endif]-->
</head>

<body>
    <header class="navbar navbar-default" role="navigation">
        <div class="container">
            <div class="navbar-header">
                <button type="button" class="navbar-toggle" data-toggle="collapse" data-target=".bs-navbar-collapse">
                    <span class="sr-only">Toggle navigation</span>
                    <span class="icon-bar"></span>
                    <span class="icon-bar"></span>
                    <span class="icon-bar"></span>
                </button>
                <a class="navbar-brand" href="index.html">Select 2 Example</a>
            </div>

         
        </div>
    </header>


    <div class="container">

        <div class="row">
            <div class="col-md-4 offset-md-4">
                 <div class="form-group">
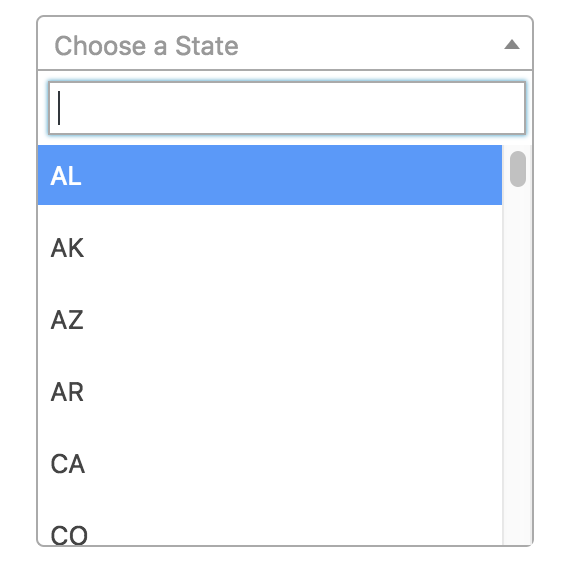
            <label for="single" class="control-label">Select State</label>
            <select id="single" class="form-control city">
                <option></option>
                <optgroup label="Alaskan/Hawaiian Time Zone">
                    <option value="AK">Alaska</option>
                    <option value="HI" disabled="disabled">Hawaii</option>
                </optgroup>
                <optgroup label="Pacific Time Zone">
                    <option value="CA">California</option>
                    <option value="NV">Nevada</option>
                    <option value="OR">Oregon</option>
                    <option value="WA">Washington</option>
                </optgroup>
                <optgroup label="Mountain Time Zone">
                    <option value="AZ">Arizona</option>
                    <option value="CO">Colorado</option>
                    <option value="ID">Idaho</option>
                    <option value="MT">Montana</option>
                    <option value="NE">Nebraska</option>
                    <option value="NM">New Mexico</option>
                    <option value="ND">North Dakota</option>
                    <option value="UT">Utah</option>
                    <option value="WY">Wyoming</option>
                </optgroup>
                <optgroup label="Central Time Zone">
                    <option value="AL">Alabama</option>
                    <option value="AR">Arkansas</option>
                    <option value="IL">Illinois</option>
                    <option value="IA">Iowa</option>
                    <option value="KS">Kansas</option>
                    <option value="KY">Kentucky</option>
                    <option value="LA">Louisiana</option>
                    <option value="MN">Minnesota</option>
                    <option value="MS">Mississippi</option>
                    <option value="MO">Missouri</option>
                    <option value="OK">Oklahoma</option>
                    <option value="SD">South Dakota</option>
                    <option value="TX">Texas</option>
                    <option value="TN">Tennessee</option>
                    <option value="WI">Wisconsin</option>
                </optgroup>
                <optgroup label="Eastern Time Zone">
                    <option value="CT">Connecticut</option>
                    <option value="DE">Delaware</option>
                    <option value="FL">Florida</option>
                    <option value="GA">Georgia</option>
                    <option value="IN">Indiana</option>
                    <option value="ME">Maine</option>
                    <option value="MD">Maryland</option>
                    <option value="MA">Massachusetts</option>
                    <option value="MI">Michigan</option>
                    <option value="NH">New Hampshire</option>
                    <option value="NJ">New Jersey</option>
                    <option value="NY">New York</option>
                    <option value="NC">North Carolina</option>
                    <option value="OH">Ohio</option>
                    <option value="PA">Pennsylvania</option>
                    <option value="RI">Rhode Island</option>
                    <option value="SC">South Carolina</option>
                    <option value="VT">Vermont</option>
                    <option value="VA">Virginia</option>
                    <option value="WV">West Virginia</option>
                </optgroup>
                <option value="TNOGZ" disabled="disabled">The No Optgroup Zone</option>
                <option value="TPZ">The Panic Zone</option>
                <option value="TTZ">The Twilight Zone</option>

            </select>
        </div>

            </div>
            <div class="col-md-4 offset-md-4">
                <form class="form-horizontal">
        

              <div class="form-group">
            <label for="single" class="control-label">Select Country</label>
            <select id="single" class="form-control select2-single">
                <option></option>
                <optgroup label="Alaskan/Hawaiian Time Zone">
                    <option value="AK">11Alaska</option>
                    <option value="HI" disabled="disabled">22Hawaii</option>
                </optgroup>
                <optgroup label="Pacific Time Zone">
                    <option value="CA">California</option>
                    <option value="NV">Nevada</option>
                    <option value="OR">Oregon</option>
                    <option value="WA">Washington</option>
                </optgroup>
                <optgroup label="Mountain Time Zone">
                    <option value="AZ">Arizona</option>
                    <option value="CO">Colorado</option>
                    <option value="ID">Idaho</option>
                    <option value="MT">Montana</option>
                    <option value="NE">Nebraska</option>
                    <option value="NM">New Mexico</option>
                    <option value="ND">North Dakota</option>
                    <option value="UT">Utah</option>
                    <option value="WY">Wyoming</option>
                </optgroup>
                <optgroup label="Central Time Zone">
                    <option value="AL">Alabama</option>
                    <option value="AR">Arkansas</option>
                    <option value="IL">Illinois</option>
                    <option value="IA">Iowa</option>
                    <option value="KS">Kansas</option>
                    <option value="KY">Kentucky</option>
                    <option value="LA">Louisiana</option>
                    <option value="MN">Minnesota</option>
                    <option value="MS">Mississippi</option>
                    <option value="MO">Missouri</option>
                    <option value="OK">Oklahoma</option>
                    <option value="SD">South Dakota</option>
                    <option value="TX">Texas</option>
                    <option value="TN">Tennessee</option>
                    <option value="WI">Wisconsin</option>
                </optgroup>
                <optgroup label="Eastern Time Zone">
                    <option value="CT">Connecticut</option>
                    <option value="DE">Delaware</option>
                    <option value="FL">Florida</option>
                    <option value="GA">Georgia</option>
                    <option value="IN">Indiana</option>
                    <option value="ME">Maine</option>
                    <option value="MD">Maryland</option>
                    <option value="MA">Massachusetts</option>
                    <option value="MI">Michigan</option>
                    <option value="NH">New Hampshire</option>
                    <option value="NJ">New Jersey</option>
                    <option value="NY">New York</option>
                    <option value="NC">North Carolina</option>
                    <option value="OH">Ohio</option>
                    <option value="PA">Pennsylvania</option>
                    <option value="RI">Rhode Island</option>
                    <option value="SC">South Carolina</option>
                    <option value="VT">Vermont</option>
                    <option value="VA">Virginia</option>
                    <option value="WV">West Virginia</option>
                </optgroup>
                <option value="TNOGZ" disabled="disabled">The No Optgroup Zone</option>
                <option value="TPZ">The Panic Zone</option>
                <option value="TTZ">The Twilight Zone</option>

            </select>
        </div>

            <div class="form-group">
                <div class="col-sm-offset-2 col-sm-10">
                    <button type="submit" class="btn btn-default">Sign in</button>
                </div>
            </div>
        </form>
            </div>
        </div>


        <script src="//ajax.googleapis.com/ajax/libs/jquery/1.12.4/jquery.min.js"></script>
        <script src="//cdnjs.cloudflare.com/ajax/libs/select2/4.0.3/js/select2.full.js"></script>

        <script src="bootstrap.min.js"></script>
        <script src="anchor.min.js"></script>
        <script>
            anchors.options.placement = 'left';
            anchors.add('.container h1, .container h2, .container h3, .container h4, .container h5');

            // Set the "bootstrap" theme as the default theme for all Select2
            // widgets.
            //
            // @see https://github.com/select2/select2/issues/2927
            $.fn.select2.defaults.set("theme", "bootstrap");

            var placeholder = "Select a State";
            
            var placeholder1 = "Select a Country";

           
            $(".city").select2({
                placeholder: placeholder,
                width: null,
                containerCssClass: ':all:'
            });
            
             $(".select2-single").select2({
                placeholder: placeholder1,
                width: null,
                containerCssClass: ':all:'
            });
            

            $(".select2-allow-clear").select2({
                allowClear: true,
                placeholder: placeholder1,
                width: null,
                containerCssClass: ':all:'
            });

            // @see https://select2.github.io/examples.html#data-ajax


            // copy Bootstrap validation states to Select2 dropdown
            //
            // add .has-waring, .has-error, .has-succes to the Select2 dropdown
            // (was #select2-drop in Select2 v3.x, in Select2 v4 can be selected via
            // body > .select2-container) if _any_ of the opened Select2's parents
            // has one of these forementioned classes (YUCK! ;-))
            $(".select2-single, .select2-multiple, .select2-allow-clear, .js-data-example-ajax").on("select2:open", function() {
                if ($(this).parents("[class*='has-']").length) {
                    var classNames = $(this).parents("[class*='has-']")[0].className.split(/\s+/);

                    for (var i = 0; i < classNames.length; ++i) {
                        if (classNames[i].match("has-")) {
                            $("body > .select2-container").addClass(classNames[i]);
                        }
                    }
                }
            });

        </script>
    </div>
</body>

</html>

Step3: don’t forget to add anchor.min.js and select2.full.js file

that’s it.

how to get your facebook feed on your website

how to get your facebook feed on your website

add a Facebook feed on your website.

Just update your Facebook page link in below code

<script>
        (function(d, s, id) {
            var js, fjs = d.getElementsByTagName(s)[0];
            if (d.getElementById(id)) return;
            js = d.createElement(s);
            js.id = id;
            js.src = "//connect.facebook.net/en_US/sdk.js#xfbml=1&version=v2.9&appId=102332590296331";
            fjs.parentNode.insertBefore(js, fjs);
        }(document, 'script', 'facebook-jssdk'));
    </script>
                 <div class="col-md-12 col-sm-12 mb-sm-100">
                    <div class="widget gallery-widget">
                        <h5 class="header-widget">Facebook Feed</h5>
                        <div class="fb-page" data-href="https://www.facebook.com/facebookpage/" data-tabs="timeline" data-width="500" data-height="260" data-small-header="true" data-adapt-container-width="true" data-hide-cover="false" data-show-facepile="true">
                            <blockquote cite="https://www.facebook.com/facebookpage/" class="fb-xfbml-parse-ignore"><a href="https://www.facebook.com/facebookpage/">V Spark</a></blockquote>
                        </div>
                    </div>
                </div>


image preview before upload using php

image preview before upload using php

image preview before upload using PHP

When the user selects a picture, an onChange event is triggered on the file input field and that we can use JavaScript’s readURL() class to onchange event to display the image for preview. When the user choose the file, the input form is going to be submitted to an equivalent page. So on its same form.

Just modified your own code after copy below code

<style type="text/css">
		.thumb
        {
        	margin: 10px 5px 0 0;
        	width: 100px;
        }
        #blah
        {
            width: 120px;
        }
	</style>

</head>
<script type="text/javascript">
        function readURL(input) {
            if (input.files && input.files[0]) {
                var reader = new FileReader();

                reader.onload = function (e) {
                    $('#blah').attr('src', e.target.result);
                }

                reader.readAsDataURL(input.files[0]);
            }
        }
    </script>

<body>
  <form id="form1" action="server.php" enctype="multipart/form-data">
        <input type='file' name="file" onchange="readURL(this);" />
        <img id="blah" src="#" alt="your image" />
        <input type="submit" name="sub" value="submit">
    </form>
</body>


How to convert an HTML website to WordPress

How to convert an HTML website to WordPress

How to convert an HTML website to WordPress

Step 1:
Preparing for HTML to WordPress Conversion The first and foremost thing is to choose the right hosting plan that best fits your requirements. Once you’ve purchased a plan, you will need to install WordPress and log into WordPress’s admin panel.

Step 2:
Before you start the site conversion, you must create a backup of your existing website data. It will empower you to eliminate all the migration risks. You can use a hard disk, flash drive or any other medium or object for data backup.

Step 3:
When you have a backup of your website, it’s time to create a WordPress theme. There are two options available:

Manually create a WordPress theme according to your static HTML website.
If your motive is to not only move the content from your HTML website into WordPress but also want the existing design, you will need to create a custom theme. Thankfully, this is not as difficult as it sounds at first. It involves the simple process of setting up some folders and files, copying & pasting, and then uploading the content. Here, you will need a code editor i.e. Notepad++ or Sublime. Moreover, you will require an HTML site’s directory and new WordPress install’s directory.

Create a New Theme Folder and Necessary Files On a desktop, simply create a new folder to store your theme files. Now, create the below-mentioned files in a code editor. You will not need to do, just leave them open for further coding.
Style.css
Index.php
header.php
sidebar.php
footer.php
Copy current CSS into New Stylesheet If you are looking forward to imitating a design, you will need to play with the CSS. So the first file you should edit is your Style.css file.

You should add the following code to the top of your file:

/*
Theme Name: Replace with your Theme’s name.
Theme URI: Your Theme’s URI
Description: A brief description.
Version: 1.0
Author: You
Author URI: Your website address.
*/
After this section, just paste your current CSS below and save the file.

Separate your existing HTML
Before we go further, let’s see how WordPress works. WordPress uses PHP to call and recover the data from its underlying database. Each file that is mentioned in this tutorial is created to tell WordPress which part of your web content needs to be shown and where. So, here what you need to do is just copy and paste your existing code into the individual files, you’ve just created and let WordPress know where to display them. Follow all the below mentioned steps to perform this:

First, open the index.html of your existing website. Highlight the section from the top to the div class=”main” tag. Now, copy & paste this section into your header.php file and save.
Again, open your index.html file and highlight the class=”sidebar” element and everything inside it. Now, copy and paste the copied part into your sidebar.php file and save.
Now, select everything that comes after the sidebar and copy & paste this part into your footer.php file and save.
In the end, copy everything that’s left in your index.html file and paste it into your index.php file and save.
• Finalize Your Index.php File

In order to settle your new index.php file, you need to make sure that it calls up all the other sections that is kept in other files you’ve created.

Place the following line of php. at the top of your index.php file:

Place following code to the very bottom of your index.php file

And last but not the least, you will need to add the primary bit of php that WordPress uses to showcase your content to the visitors.

Now, the final step is to add the below-mentioned code in the index.php.

<?php if ( have_posts() ) : ?>
<?php while ( have_posts() ) : the_post(); ?>
  <div id="post-<?php the_ID(); ?>" <?php post_class(); ?>>
    <div class="post-header">
       <div class="date"><?php the_time( 'M j y' ); ?></div>
       <h2><a href="<?php the_permalink(); ?>" rel="bookmark" title="Permanent Link to <?php the_title_attribute(); ?>">
        <?php the_title(); ?></a></h2>
       <div class="author"><?php the_author(); ?></div>
    </div><!--end post header-->
    <div class="entry clear">
       <?php if ( function_exists( 'add_theme_support' ) ) the_post_thumbnail(); ?>
       <?php the_content(); ?>
       <?php edit_post_link(); ?>
       <?php wp_link_pages(); ?> </div>
    <!--end entry-->
    <div class="post-footer">
       <div class="comments"><?php comments_popup_link( 'Leave a Comment', '1 Comment', '% Comments' ); ?></div>
    </div><!--end post footer-->
    </div><!--end post-->
<?php endwhile; /* rewind or continue if all posts have been fetched */ ?>
    <div class="navigation index">
       <div class="alignleft"><?php next_posts_link( 'Older Entries' ); ?></div>
       <div class="alignright"><?php previous_posts_link( 'Newer Entries' ); ?></div>
    </div><!--end navigation-->
<?php else : ?>
<?php endif; ?>


How to remove .php, .html, .htm extensions with .htaccess

How to remove .php, .html, .htm extensions with .htaccess

What is an .htaccess file
An .htaccess file may be a simple ASCII file that you simply create with a text editor like Notepad or TextEdit. The file lets the server know what configuration changes to form on a per-directory basis.

Please note that .htaccess is that the full name of the file. It isn’t file.htaccess, it’s simply .htaccess.

.htaccess files affect the directory during which they’re placed in and every one children (sub-directories). for instance if there’s one .htaccess file located in your root directory of yoursite.com, it might affect yoursite.com/content/, yoursite.com/content/images/, then on…

It is important to recollect that this will be bypassed. If you don’t want certain .htaccess commands to affect a selected directory, place a replacement .htaccess file within the directory you don’t want to be affected with the changes, and take away the precise command(s) from the new file.

Features
With an .htaccess file you can:

Redirect the user to different page
Password protect a selected directory
Block users by IP
Preventing hot-linking of your images
Rewrite URLs
Specify your own Error Documents
In this tutorial we’ll be focusing only on rewriting URLs.

Removing Extensions
To remove the .php extension from a PHP file for instance yoursite.com/wallpaper.php to yoursite.com/wallpaper you’ve got to feature the subsequent code inside the .htaccess file:

RewriteEngine On
RewriteCond %{REQUEST_FILENAME} !-f
RewriteRule ^([^\.]+)$ $1.php [NC,L]

If you would like to get rid of the .html extension from an HTML file for instance yoursite.com/wallpaper.html to yoursite.com/wallpaper you merely need to change the last line from the code above, to match the filename:

RewriteRule ^([^\.]+)$ $1.html [NC,L]

That’s it! you’ll now link pages inside the HTML document without having to feature the extension of the page. For example:

wallpaper
Adding a trailing slash at the top
I received many requests asking the way to add a trailing slash at the top, for example, yoursite.com/page/

Ignore the primary snippet and insert the code below. the primary four lines affect the removal of the extension and therefore the following, with the addition of the trailing slash and redirecting.

RewriteEngine On
RewriteCond %{REQUEST_FILENAME} !-f
RewriteRule ^([^/]+)/$ $1.php
RewriteRule ^([^/]+)/([^/]+)/$ /$1/$2.php
RewriteCond %{REQUEST_FILENAME} !-f
RewriteCond %{REQUEST_FILENAME} !-d
RewriteCond %{REQUEST_URI} !(\.[a-zA-Z0-9]{1,5}|/)$
RewriteRule (.*)$ /$1/ [R=301,L]

Link to the HTML or PHP file an equivalent way as shown above. Don’t forget to vary the code if you would like it applied to an HTML file rather than PHP.

For Example

RewriteEngine On
RewriteCond %{HTTP_HOST} !^www\. [NC]
RewriteRule ^(.*)$ https://www.%{HTTP_HOST}/$1 [R=301,L]
RewriteRule ^location/([0-9a-zA-Z_]+) job-by-city.php?city=$1
RewriteRule ^category/([0-9a-zA-Z_]+) job-by-category.php?category=$1

RewriteRule ^openings/([0-9a-zA-Z_]+)/([0-9a-zA-Z_]+) jobs-link.php?city=$1&category=$2

RewriteRule ^details/([0-9]+) job-details.php?jdid=$1

ErrorDocument 404 /404.php

RewriteRule ^jobs-in-delhi?$ jobs-in-delhi.php

Some people asked how you’ll remove the extension from both HTML and PHP files. I don’t have an answer for that. But, you’ll just change the extension of your HTML file from .html or .htm to .php and add the code for removing the .php extension.

How to Increase the Maximum File Upload Size in WordPress

How to Check Your Maximum File Upload Size Limit in WordPress?

WordPress will automatically show the utmost file upload size limit once you are uploading images or media. to see it you’ll simply attend Media » Add New page and you’ll see the utmost file uplaod size limit for your WordPress site.

1: Theme Functions File

There are cases where we have seen that just by adding the following code in theme’s functions.php file, you can increase the upload size:

@ini_set( 'upload_max_size' , '32M' );
@ini_set( 'post_max_size', '32M');
@ini_set( 'max_execution_time', '300' );

htaccess Method

Some people have tried using the .htaccess method where by modifying the .htaccess file in the root directory, you can increase the maximum upload size in WordPress. Edit the .htaccess file in your WordPress site’s root folder and add the following code:

1
2
3
4
php_value upload_max_filesize 64M
php_value post_max_size 64M
php_value max_execution_time 300
php_value max_input_time 300
how to remove .php extension from url in php

how to remove .php extension from url in php

remove .php extension from url in php

Just follow these steps

Open .htacess file and copy below code in .htacess file

 
RewriteEngine On

RewriteRule ^test?$ test.php

Here test is your page name
Now you can visit your page like abc.com/test

remove ?id from url in php

if your url is user.php?id=1
then just copy the below code in your htacess file
RewriteEngine On

RewriteRule ^user/([0-9]+) user.php?id=$1


RewriteRule ^test?$ test.php

RewriteRule ^user/([0-9]+) user.php?id=$1


RewriteRule ^shop/cat/([0-9a-zA-Z]+)/subcat/([0-9a-zA-Z]+) shop.php?cat=$1&subcat=$2


  That’s It. Now you see a magic in your url    
active class using php In 5 Minutes

active class using php In 5 Minutes

You can simply follow steps and add active class in your navigation using PHP

Step1:  In Header page Modified navigation link as per your need

<li class=”nav-item <?php if ($phpSelf==”index.php”) { echo “active”; } ?>”><a href=”index.php” class=”nav-link”>Home</a></li>
<li class=”nav-item <?php if ($phpSelf==”about.php”) { echo “active”; } ?>”><a href=”about.php” class=”nav-link”>About</a></li>
<li class=”nav-item <?php if ($phpSelf==”menu.php”) { echo “active”; } ?>”><a href=”menu.php” class=”nav-link”>Menu</a></li>
<li class=”nav-item <?php if ($phpSelf==”blog.php”) { echo “active”; } ?>”><a href=”blog.php” class=”nav-link”>Stories</a></li>
<li class=”nav-item <?php if ($phpSelf==”contact.php”) { echo “active”; } ?>”><a href=”contact.php” class=”nav-link”>Contact</a></li>
<li class=”nav-item cta”><a href=”reservation.php” class=”nav-link”>Book a table</a></li>

Step2: Open particular page like index.php,about.php so on..

Step3: Add these code before including header.php

$phpSelf = trim(basename($_SERVER[‘PHP_SELF’]));

That’s It. Now you can see your navigation link has active class

Thanks. Basant Mallick